Saturday, July 30, 2011

Showing my true colors

I got a little blue/green inspiration from this picture I found over at Scrapping Everyday Miracles.  The Sweet Peach Crop Shop Blog is also having an ad inspired challenge, so I decided I'd better get to work!
I hesitated to put this layout on my blog since it includes these pictures, but I just simply thought it was too funny not to scrapbook!  I went to exercise for an hour one night and came back to find my daughter all dolled up....marker style.  She had drawn pictures of us and messages that say I love you to mommy and daddy all over her body.  Now where was daddy during this time you ask?  Where daddies usually are when mommies are gone.....downstairs watching ESPN while daughter plays happily.   Ah, you gotta' love men!  I guess I can't really say anything....I colored the inside of my mouth with markers when I was in elementary school - my music teacher always reminds me!  If only I had a picture of that one.   I guess like mother, like daughter!

Wednesday, July 27, 2011

These Boots!

Here's another little picture that was given to me and is a bit beat up, but I just had to use it!  This picture is from our PandaMania VBS we had at church this year.  What I loved about this picture is that she had to wear these boots to VBS!  If you can't tell, they are purple with white polka dots and white fur at the top!  Mind you it is an average 90 -95 degrees around here in the summer time!  But she had to wear these boots just in case the kiddie pool with goldfish spilled over and got her feet wet.   Interesting reasoning....but hey, at least they matched her outfit.  Ah, the personalities of 4 year olds!
Here you can see my friend, Jenny, was nice enough to let me not only use her scraps of purple/white polka dot paper, but she also cut out the boots with her Cricut!  I added a little fringe from some Christmas tinsel SU sold this past Christmas - it was perfect for the boots!  I did my journaling right under the bottom wave.  

Monday, July 25, 2011

Just Be Exactly Who You Are

I've had this sketch printed out for a while and last night I found the perfect page for the sketch.  I had a completely different title and journaling planned for this since I was at a friend's house cropping, but when I got home, I realized my journaling card was not going to fit at all....so I just changed it to a different title that serves as the journaling. 
I officially killed my Lawn Party Studio Calico kit with this page.  I had this extra piece of plaid paper that I just adored.  And then I found this picture - a bit beat up, but it was just so darling!  And it matched almost perfectly! 
Basically, this page was made from some scraps and a few pieces I added from the Sweet Peach Crop Shop kit I bought a couple of weeks ago.  I loved these transluscent flowers - so pretty!

Saturday, July 23, 2011

Poppy & Halleigh: Fishing Adventure

Hello, all!  Today's project goes with the Easy Craft Projects' summer theme.  Now, be aware that the photos in this mini album were taken mostly by my 4 year old daughter.....so think from a 4 year old's perspective of fishing with her Poppy!
As a side note - most of these materials (80% or more) came from the May Sweet kit from Sweet Peach Crop Shop.
So, we start with the cover - a little bit of American Crafts Thickers, Crate Paper borders, and a Studio Calico tag.  The ribbon is retired Certainly Celery ribbon from SU.
Here is the first thing you see when you open the book - it is more of the same materials.  I added another Studio Calico tag, Basic Grey letters, October Afternoon label, and a Making Memories adventure sticker (it's too shiny to see that, though!)
 Here is the first part of the pictures - I used lots of pieces from the Crate Paper sticker sheet and a scrap from a Studio Calico coupon! 
 Here is the first flip of the little scrapbook.  Remember - most of the pictures are from a 4 year old....so thus, we have a dead catfish.....very important to her!  Kinda' gross if you ask me, though!  I used my IRock to add a few rhinestones in a couple of places.  I also found some summery fishy patches and chipboard pieces - maybe K & Company? 
 And here is a final look at all of the pages opened up.  In the center is a little journaling pocket and at the bottom you see her proud picture with her first catch of the day - a little blue gill.
And I would be in trouble if I didn't include a picture with her in it.  I guess I should be glad she hops in every picture I take - I know that won't last forever!  

Monday, July 18, 2011

Pour Out Your Blessings

I made this using a Studio Calico kit and the Sunday Sketch from last week.  I misted the back of a making memories page with Lily Pad and Caribbean Blue Glimmer Mist for that center piece. 
 Here is a title banner with October Afternoon stickers as well as Thickers for the letters. 

Finally, a few Maya Road chipboard pieces with more glimmer mist and some strips of umbrella paper.  The letters here are also Studio Calico.

Friday, July 15, 2011

Steak Rules!

I found a challenge today called the
Basically this challenge reminds you to use up your stash before all the new stuff comes out.  So, I decided to go with the Elementary line from Studio Calico that I got during the spring at a CKC Convention. 
Admittedly I am a bit of a cheeseball…..so here’s what happened in my goofy little mind. 
I went looking through my stash and found these little bits and pieces of Harper’s Ruler paper and thought…..what in the world could I do with that?  I had some pictures of us eating steak…..When you put it together, you get {Steak} Rules!!  I know…pretty goofy….but we do love some grilled steak around here.  Our daughter has joined us in our delight in eating yummy, delicious, steak – it’s funny to see her try to cut some steak, too.  So, without further ado, here is the layout!


 I decided to use the ruler paper for a roof and make a little scene with pictures of us eating inside it. 

The flash got the picture here, but you can see the wood veneer frame – I painted it with some Glimmer Glaze – a green color.  You also see some Bluegrass Mr. Huey at the bottom for the grass.

 And then at the top I used Lemonade Mr. Huey for the sun and painted the clouds with Tide Pool Glimmer Glam.  Love the sparkles in that stuff!  Very pretty! 

You can also sneak a little peek at the Crate Paper ribbon I used for the trim of the roof of my little house. 
This layout took me far out of my comfort zone, but in the end, I kind of like it!

Wednesday, July 13, 2011

Tattered Angels Glitz and Glam class

If you’re joining me today, I’m going to tell you a little bit about a class I took yesterday at the scrapbook store in Lexington.  This class was not a class in which you make something, it was a technique based class using Tattered Angel products.  The products used were Glimmer Mist, Glimmer Glam, Glimmer Glaze, and the new Chalkboard Mist.  Here are a few of the projects we made to practice the techniques.
Okay, so here you see a masked image with a Key Lime Pie color misted on the background.  Then you see a piece of patterned paper.  The original color of the leaves did not match the green of the background, so I spritzed some of the glimmer mist on a craft sheet and used it like waterpaint.  I also used the glam and glaze to color the roses – I was just playing with it to see the different results.  It kind of looks like epoxy in some spots!


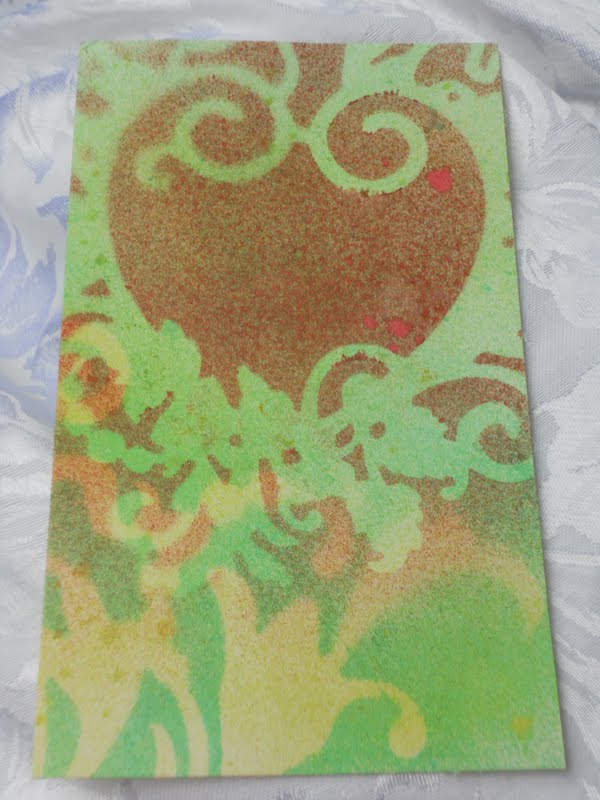
So here is another creation I made using several different masks.  I spritzed the background in Key Lime Pie, then masked and spritzed again with Bermuda Blue, and finally, I masked a heart and spritzed it with Mel’s Diner. It’s kind of pretty!
Now, here is one I’m going to try with my Big Shot…This piece of chipboard was embossed, but the raised image was not far from the surface, so it was a little messier than what I’d like to see.  I took a tea light candle and rubbed the wax across the embossed area to form a resist.  I spritzed the whole piece of chipboard with Patina and then wiped with a paper towel.  The Glimmer Mist resists the waxy area giving it a gorgeous shabby chic look!

Okay, I tried to get a closeup of this, but no luck.  I spritzed the background with Key Lime Pie and then watercolored the dragonflies with Patina and Bermuda Blue.  Again, I just spritzed the glimmer mist on a craft sheet and watercolored away with a little paint brush. 
What you can’t see is that I went back over the top dragonfly with Tide Pool Glimmer Glam and also with Glimmer Glaze – it just adds an even prettier little shimmer to the look! 

Here is another of my favorites.  This is a piece of embossed metal with lots of little grooves.  I couldn’t tell you all the color names here – but it is a combination of Glimmer Glam and Glimmer Glazes just painted on – very messy, but a great result in the end!

This one took a little more time to do, but the result was very cool!
I started with a piece of a dictionary to give it a vintage look, next  I took the mask of the bird and painted gesso all across it trying to smooth out the lines as much as possible.  That piece had to dry for quite some time – maybe a couple of hours!  After it was dry, I poured Glimmer Glaze all over it and just smeared it all across with a paper towel.  Once again, the gesso acts as a resist, so the red color stayed on my red bird and mostly came off of the white pasty paint.  I then spritzed a suede color on the right side to really give that dictionary an aged look.  Pretty cool, huh?!

And now for my personal favorite….the butterfly on acetate paper (or an overhead for old schoolers like me!).  The butterfly was stamped in a StazOn type ink.  I used Tide Pool and some other color of Glimmer Glaze to paint the butterfly – lots of it – it was really thick  so it would show up.  Again, I had to let that dry for a while.  Once it was dry, I put another mask on and this time spritzed the chalkboard mist on the back of the acetate.  Since it is opaque, it really sticks to the acetate and shows up with a light mist.  Very pretty result! 
Now….off to play with new toys!

Monday, July 11, 2011

10 Things

DSCN9779
I wanted to make a 10 things page and I wanted to use this silly picture of my husband also.  I decided it was a great picture to make a 10 things I love about you page with!
DSCN9781 
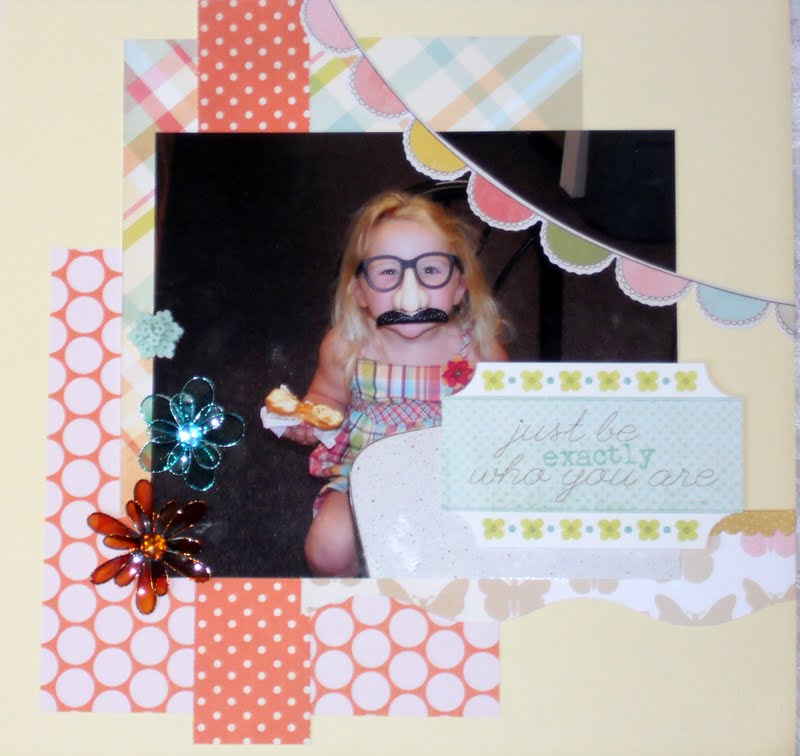
Here is the journaling of just a few random things I was thinking about tonight.  That list might change tomorrow, but I never have trouble thinking of 10 things I love about my husband.  We just celebrated our 13th anniversary!  And….I still love him even more than when we got married.  That’s why I love scrapping….it reminds me of the joy in my life everyday!
DSCN9782
And here is the top little section of elements.  I just used the same basic little pieces at each spot. 


I found this sketch over at Sketches in Thyme that worked well for this page. 

Quickie Doily Card

DSCN9772 

We have been at King’s Island for SpiritSong for the last 3 days, so I have pretty much been out of commission for blogging and scrapping!  Here is a quick little card I made using some of my leftovers the other day before I left. 

The bottom layer is a scrap of Echo Park paper from the Walk in the Park line of paper.  I had a doily leftover from a layout I made last week.  To make my doily, I layed a glimmer screen on top and spritzed Bluegrass Mr. Huey on it and then took the glimmer screen off.  I then spritzed the doily again with lemonade Mr. Huey for the yellow look.

The ribbon is from Crate Paper and the flower is from Prima.

Wednesday, July 6, 2011

Only Grace

Toby's great uncle passed away recently and I found these pictures as I was printing a set out the other day.  I thought it only fitting that I would make a page about him.  I really didn't know him that well - we only visited him 3 times or so since I've been married to my husband. 
I thought of this song, "Only Grace" by Matthew West that I thought was a fitting title.  You see, his great uncle was well into his 90's before he gave his heart to Christ.  He had a very hard heart and his actions reflected that.  Yet at the age of 95, Toby's father and his beloved pastor went to visit him once more to plead for a change in his heart and the Holy Spirit fell upon his life in a miraculous way!  He truly changed his entire life - even if just for a short season of years at the end of his life.
Thus, the song - It's only grace - that's all that was needed for him to now be in heaven with the Lord as he passed away just a few months ago. 

Enough preaching, huh?  Get on to the details!  Here is a little Fancy Pants coffee filter at the top.  I used a glimmer screen and spritzed Bluegrass Mr. Huey on top and then another coat of Lemonade on top to add a soft yellow shade in the masked area.  I topped it off with a Crate Paper sticker and a making memories flower.
The Scrapping Every Day Miracles blog had a stitching challenge, so I thought some faux stitching would look neat around the doilies, so I pierced holes around each doily to give my sidebar a unique look.  The little journaling spot is from an October Afternoon sticker sheet - I cut around my Pool Party (SU) paper to mimic the edge of the journaling label.  I added another of the making memories flowers in the center of a doily.

And here is the title.  You can see the Crate Paper background paper and another coffee filter underneath the flower spot.  I actually handcut that flower from a matching Crate Paper label sticker sheet.  The white and yellow papers and the letter stickers are from Basic Grey.


Tuesday, July 5, 2011

Double Dogs

 After my hubby got to do his dream game - being the head ref at a state finals game (really just a complete blowout!) - we went to eat with some of the refs from his regular crew.  They were there to cheer him on - or heckle him actually!
We went to Double Dogs in Bowling Green - they serve the kids meals out of doggie bowls!  We'd never been there before and we always like to try new places, so thus the title.
I just added a few little strips of black rhinestones - they were leftover from the fall and I figure they are not too frilly!  The DH likes things plain and simple!

Monday, July 4, 2011

Are You Ready for some Football?

I couldn't help but think of this song from Monday night football when I was making this page of my husband being the head referee in a state football championship.
I used the Paper Moon kit from Studio Calico for the patterned paper.

All of the stickers and letters are from making memories.  I think Toby's mom got those footballs at the dollar store and the loudmouth football fan on my O is from a Lucky Girl kit.

Sunday, July 3, 2011

My Precious Loves

Earlier this week I showed some pictures of my loves.  I decided to scrap a photo of my sweeties with some scraps of October Afternoon paper.  I just adore this paper, so I think I have used it on 5 or 6 layouts already! 
The background paper is from Basic Grey.  I added some crochet trim lace and Cherry Cobbler baker's twine from Stampin' Up and some Crate Paper and October Afternoon stickers.  I finished it off with a visual triangle using vintage Jolee's Boutique flowers and a feather accent from K & Company.

Friday, July 1, 2011

That's My brownie!

Here's a pic of my daughter at our fave coffee shop in town.  During the school year I have to work late on Monday's, so my hubby drops her off for me to take her to dance.  We go to the coffee shop for a snack each week in between and one day we had to wait in a long line.  She was so afraid someone was going to take the last brownie that she started having a conversation with it through the display window!  It was just so funny - I couldn't resist a sweet little layout to remember her silly little quirks!  Brownie Monster!

Supplies:  Paper & letter stickers - Basic Grey, Flowers - making memories, prima, journaling tag - studio calico, pen - American Crafts